If you’re new to microscopes and are not familiar with the parts of the microscope it can be quite intimidating to get started. Once you have an understanding of the parts of the microscope it will be much easier to navigate around and begin observing your specimen, which is the fun part!
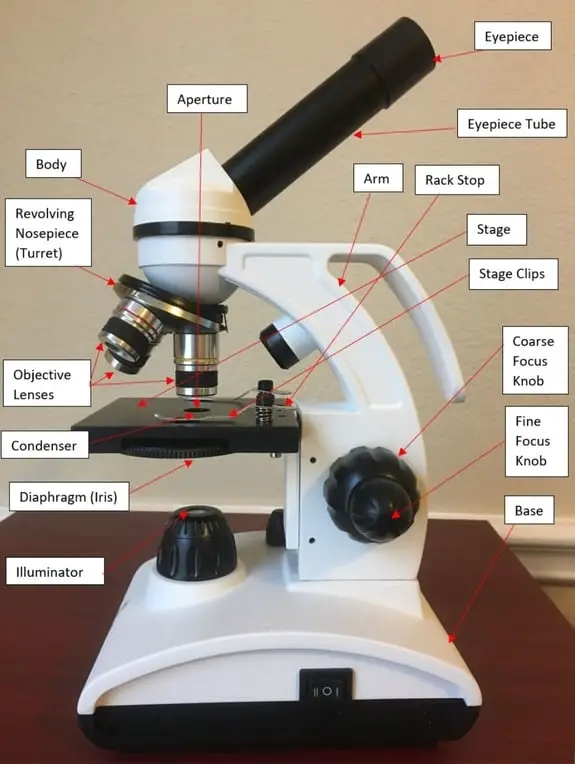
The 16 core parts of a compound microscope are:
- Head (Body)
- Arm
- Base
- Eyepiece
- Eyepiece tube
- Objective lenses
- Revolving Nosepiece (Turret)
- Rack stop
- Coarse adjustment knobs
- Fine adjustment knobs
- Stage
- Stage clips
- Aperture
- Illuminator
- Condenser
- Diaphragm
As a side note, the microscope used in this post is a great entry level or beginner microscope if you are trying to get someone interested in microscopes, microbiology, or science in general. It’s actually not a toy microscope, it’s a functional microscope that produces great images for the price. I bought it for less than $100 dollars but you can check the current price on Amazon.
1. Head (Body)
The head, also referred to as the body of the microscope, is a structural component that contains the optical parts of the microscope. The figure below shows the area of the microscope considered to be the body of the microscope.
If you were to open the body of the microscope you would find a mirror or prism depending on the type and quality of the microscope. The prism or mirror is used to reflect the light and reorient the image by making it appear right side up.
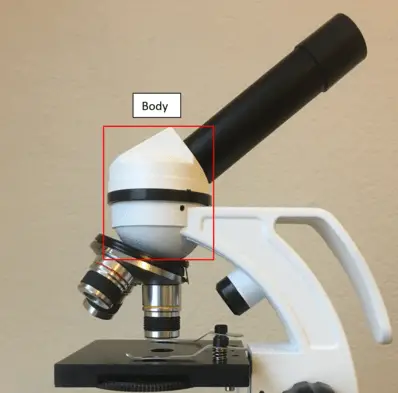
In compound microscopes with two eye pieces there are prisms contained in the body that will also split the beam of light to enable you to view the image through both eye pieces.
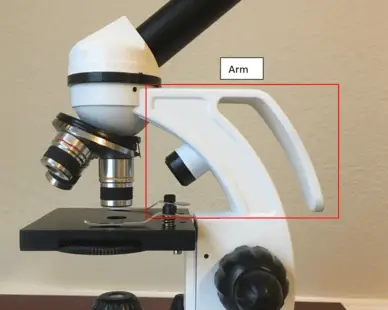
2. Arm
The arm of the microscope is another structural piece. The arm connects the base of the microscope to the head/body of the microscope. If you watched any lab safety videos, you’ll probably see the arm referenced as one of the pieces you should hold on to when carrying microscope. The arm is a curved piece in some microscopes and a straight piece in others, but the function is the same in all microscopes.
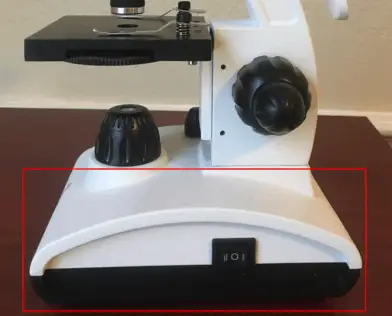
3. Base
The base is the last structural piece of the microscope. The base is at the bottom of the microscope and is used to support the microscope. A heavier based tends to be a more desirable feature because it reduces the chance of slight movements throwing off the focus and view of the microscope. The obvious downside is that is makes the microscope heavier to move around.
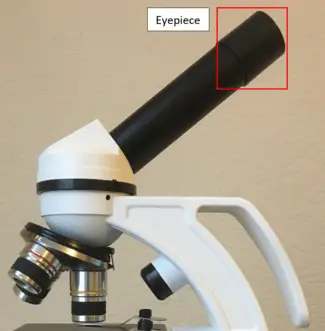
4. Eyepiece
The eyepiece, also known as the “Ocular”, is the first magnification lens you will look through in a compound microscope. Put simply, this is where you put your eye to see the image. Usually eyepieces come in 10X magnification, or 15X magnification but they can vary from 5X – 30X.
For example, my first microscope came with a 10X and 25X eyepiece which was pretty cool because it gave me some nice variability in the magnification levels I was able to achieve.
Some compound microscopes will have a small screw keeping the eyepiece in place so if you are not able to lift the eyepiece out of the eyepiece tube, you may want to check the eyepiece tube to see if there is something holding it in place. Eyepieces are meant to be interchangeable.
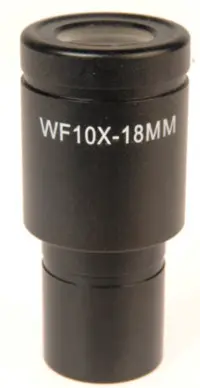
On the eyepiece you will see some letters but if you are new to microscopy, it is not readily apparent what they mean. Let’s take the example “WF 10X – 18MM”. The “WF” stands for wide field and just means it has a wider field of vision than other eyepieces. The “10X” is the magnification of the eyepiece. The “18MM” is the length of the diameter of the eyepiece lens in millimeters.
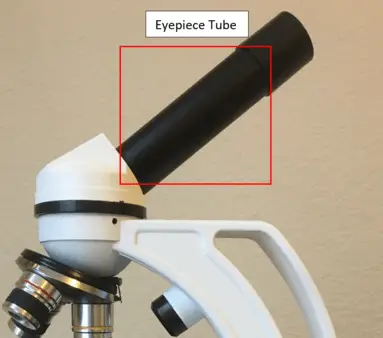
5. Eyepiece Tube
The eyepiece tube, also known as the body tube, holds the eyepiece in place and is the bridge between the eyepiece and the objective lens.
6. Objective Lenses
Objective lenses are arguably the most identifiable parts of a microscope because these are the lenses you see pointing at the specimen. You will usually find 3 or 4 objective lenses and they can range in magnification power from 4X, 10X, 40X, to 100X.
The objective lenses are marked with the magnifications, but you can also tell the higher magnification objective lenses form the lower ones because the higher ones will be longer, and the lower ones will be shorter.
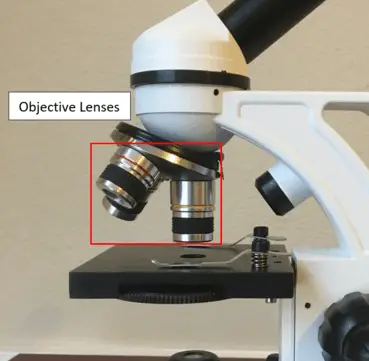
Some higher powered objective lenses have a spring setting where the lens will retract if it is pressed up against a slide. The higher the magnification, typically, the closer the objective lens needs to be to the specimen to achieve a clear image so the spring retraction will prevent damage to the objective lens if it comes into contact with the slide.
Objective lenses are interchangeable between microscopes if they conform to DIN (Deutsches Institut für Normung) standards. DIN is a nonprofit organization that develops standard practices including manufacturing and quality standards in many fields of technology.
You might hear the word parcentered when looking at objective lenses. Parcentered just means that when you rotate the objective lens and click the next level objective lens in place the specimen will remain in focus (although typically will require some minor adjustment).
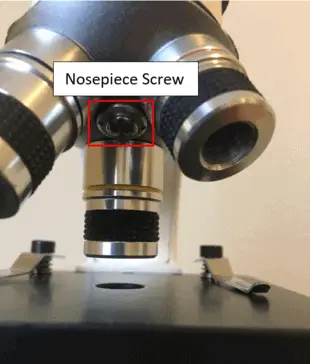
7. Revolving Nosepiece (Turret)
The nosepiece is where the objective lenses are screwed in and can be rotated to easily change to the next objective lens.
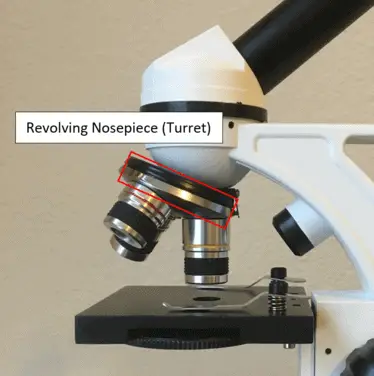
There are times where a nosepiece can become too loose or too tight making it difficult to adjust the objective lenses. Typically, there is a slot-headed screw in the middle of the nosepiece that, if you tighten it or loosen it, should correct the issue.
8. Rack Stop
A rack stop is a part that prevents the stage from being raised too far and hitting the objective lens. It doesn’t take much to damage an objective lens, so this is a very important part.
Typically, the microscope will ship with the rack stop already adjusted correctly but there may be cases where you need to adjust it to allow you to get slightly closer to the slide. As you can see this microscope does not have one but there is a screw for it.
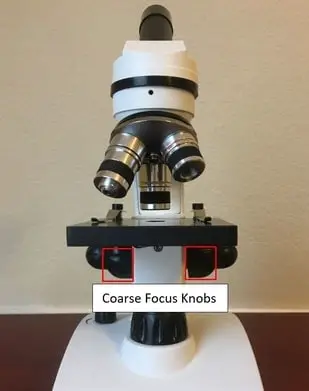
9. Coarse Adjustment Knobs
The coarse adjustment knobs are used to obviously focus the microscope by raising and lowering the stage closer or further away from the objective lens but the reason it is called “coarse” is because the movement of the coarse adjustment knobs will move the stage more rapidly than the fine adjustment knobs.
Coarse adjustment knobs are used first on the low power objective lenses. This will help you quickly get the specimen in focus. Typically, coarse and fine adjustment knobs are built inline in a descending fashion so that you can keep viewing the microscope and find the appropriate adjustment knob just by feel not requiring the users to glance down and find a different knob.
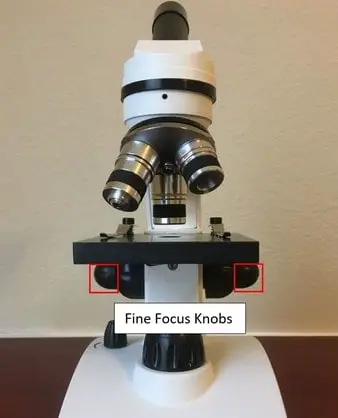
10. Fine Adjustment Knobs
Fine adjustment knobs in contrast to the coarse adjustment knobs are going to move the stage much slower and give you much more control over the movement up or down of the stage.
The fine adjustment knobs are used at the high power levels. On some microscopes the fine adjustment knob very quietly clicks giving you additional auditory indicators to help you focus your specimen.
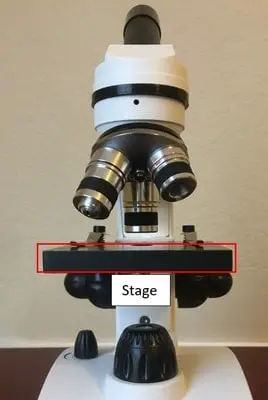
11. Stage
The stage is where the specimen is placed for examination under the microscope. The stage is a flat platform that moves up and down by turning the coarse and fine adjustment knobs. The movement closer or further away from the objective lens is what allows the specimen to come into focus.
Some microscopes have a mechanical stage. A mechanical stage consists of slide clips that hold the slide in place and allows you to move the slide left, right, up and down by turning knobs on the stage instead of using your hands to move the slide.
Moving the slide with your hands makes it harder to achieve the focus and view you are looking for. The mechanical movements allow for a more precise positioning of the slide.
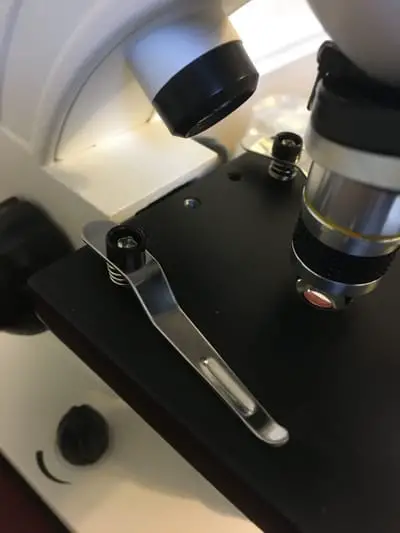
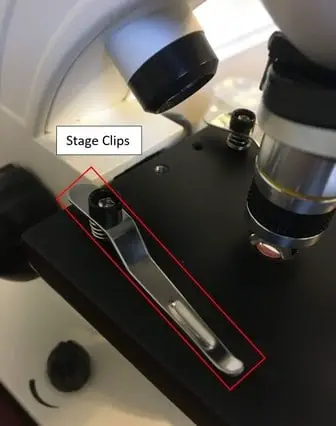
12. Stage Clips
Stage clips hold the slide in place. If you have the true stage clips, they work just like clips. They are forced down by a spring and you just lift the clip and put the slide underneath. The clip will keep the slide in place.
If you have a mechanical stage, the clips act more like a vice where you adjust the clips to clamp the slide in place. You can then turn the knobs of the mechanical stage to move the slide to the desired position.
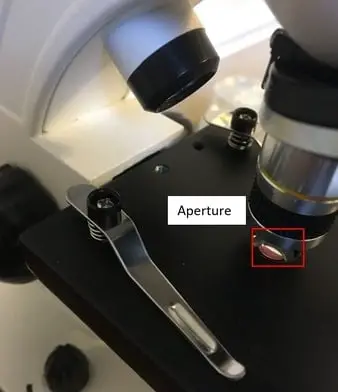
13. Aperture
The aperture is the hole in the center of the microscope stage where light makes its way to the stage. Numerical aperture is related but it is more of a concept related to the angle of the cone of light that shines through the stage than a component part of the microscope.
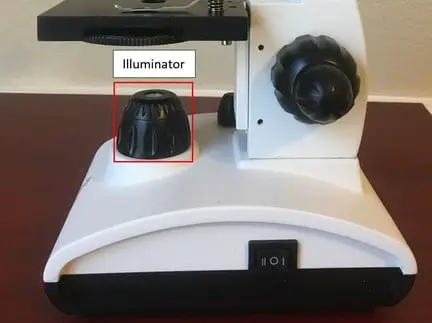
14. Illuminator
The illuminator as you can probably derive from the name, is the light source of the microscope. Most microscopes have a built in 110 volt steady light source that shines up through the microscope stage aperture.
Although most microscopes have a built in illuminator that generates the light, there are some old school microscopes that have a mirror as an illuminator and reflect light coming from an external light source up through the microscope stage to illuminate the specimen.
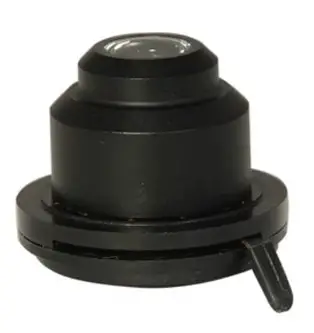
15. Condenser
The condenser is used to capture and focus the light up through the stage. The condenser lenses have the most utility at higher magnification powers like 400X and above and microscopes that have condenser lenses will be able to render a sharper image than those without and the 400X and above range. In the example microscope the condenser is actually built into the stage of the microscope and achieves a numerical aperture of 0.65.
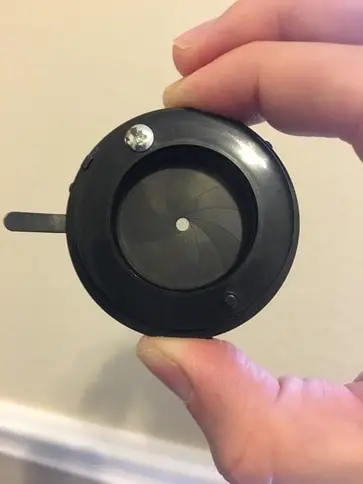
16. Diaphragm (Iris)
The Diaphragm, also called “Iris”, is located under the stage and is used to adjust and change the intensity and size of the cone of light that shines up through the side. This is done by a rotating disc under the stage that has different sized holes for the light to shine through. The objective lens is only able to gather the light information within a given numerical aperture depending on the objective, refractive medium, and distance of the objective to the slide. The diaphragm is used conjunction with the condenser lens to achieve the optimal numerical aperture for the objective.
That said, visually there is no hard and fast rule on which setting is needed for a given magnification level. The setting can depend on the transparency of the specimen, and the degree of contrast you are looking for.
Takeaways
There is much more to learn about each of these parts of the microscope, but I hope this has been a good starting point for you to feel comfortable with the microscope and start to find your way around. There are lots of terms and terminology in microscopy but don’t let that deter you. Most of the terms have very simple explanations.