
You may have noticed your largest magnification objective, usually the 100X objective, has the word “Oil” printed on the side. So, what does this mean and why is it different from your other objectives?
The word “Oil” refers to oil immersion which is a microscopy technique used to achieve a higher numerical aperture that is attainable when observing objects through the medium of air.
If you’re not sure what some of those words mean don’t worry. In this post we will go through why immersion oil is used, how to use it, and then how to clean it off when you’re finished so you don’t ruin your objective.
Why is Immersion Oil Used?
In a light microscope, light is the basis for the formation of an image and the objectives ability to collect that light will ultimately determine how resolved an image turns out to be. This is what is known as resolution.
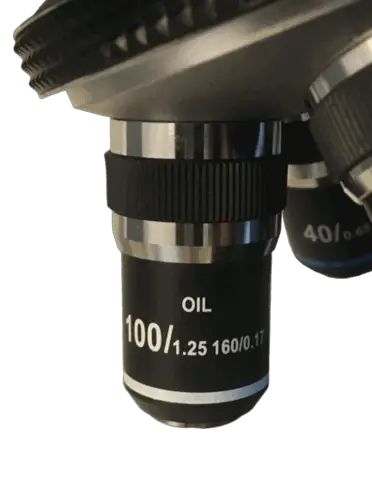
On the side of the objective you will see markings like the ones shown below. The large bold numbers are the magnification of the objective and the number following the slash is the numerical aperture. Numerical aperture is a numerical expression that defines the objectives ability to collect light. The number is calculated and based on half of the angular aperture of the cone of light that shines through the aperture in the stage. Numerical aperture is a slightly complex topic so if you are not familiar with numerical aperture see Microscope Numerical Aperture: A Layman’s Explanation.
When the light shines through the specimen some light is refracted through and around the specimen which forms the image. For the objective to form the best and most resolved image the numerical aperture must match, or be close to, the recommended numerical aperture for the objective lens that you are using.
On the lower power objectives, you will notice that the numerical aperture is lower, and the working distance is higher, and the more you increase in magnification the lower the working distance is, and the higher the numerical aperture gets. The working distance is just the distance between the specimen and the objective lens. On lower magnification objective lenses, the stage is at a lower level and then as you move to the higher and higher power objectives you have to raise the stage to focus the image.
On your condenser you will notice that there is an iris diaphragm that has different markings that define the numerical aperture. This lets you adjust the numerical aperture to match the objective that you have locked into position. This is an important point. To get the best resolution, your numerical aperture should be set close to the recommended numerical aperture printed on the side of the objective.
You will notice that your highest numerical aperture setting will match your highest objective numerical aperture requirement. For example, my highest power objective is a 100X objective with a 1.25 numerical aperture. My condenser has a maximum numerical aperture of 1.25. The 100X oil objective I am using is this objective lens if you want to grab it on Amazon.
When you are looking at a specimen with a non-oil objective also known as a dry objective, typically anything from 4X all the way up to 80X, the medium between the objective lens and the specimen is air. There have been relatively recent developments that have enabled manufacturers to produce dry 100X objective.
On a personal note I will be replacing my oil immersion 100X objective with this 100X dry objective available on Amazon. The “medium” just means what is between the specimen and the objective lens and if you are not using oil immersion the medium is air. The theoretical limit to numerical aperture with air is 1.0. If you look at your oil objective, you will probably see that the numerical aperture recommended is 1.25.
Even though you can set your condenser to 1.25 it does not matter because the limit to numerical aperture in air is 1.0. So, there is a mismatch between the achievable numerical aperture and the numerical aperture required by the objective. So how do we reach numerical apertures greater than 1? This is where the immersion oil comes in.
The immersion oil has a refractive index of greater than 1 (typically around 1.5) which means that the way that light travels through the oil will reduce the amount of stray light and will channel more light through the objective lens.
What is Immersion Oil?
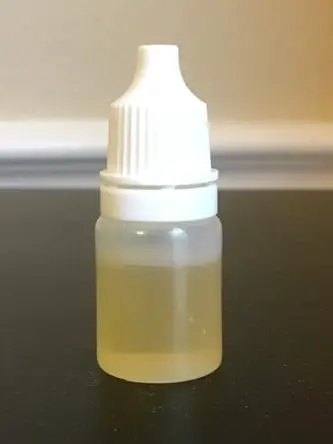
Now that we know why you would ever use immersion oil let’s examine exactly what is this oil that we are about to use. In the past the most common type of immersion oil was cedar oil however this type of oil was quickly replaced by synthetic oils because of some a few inherent issues.
The first was that cedar tree oil absorbs, blue and ultraviolet light and turns a yellowish color after a certain amount of time. These can alter and distort imaging on a microscope. Also because of its acidity, objectives can be damaged over time and after repeated use. Today the most common types of immersion oils are synthetic immersion oils made specifically for microscopy.
These oils are made from non-hardening hydrocarbons and petroleum by-products. Although there are multiple types of immersion oils Type A and Type B oils are the most common types of immersion oils. Type A immersion oils have a higher viscosity which enables you have an increased working distance and reduces the formation of air bubbles.
Type B immersion oils have a higher viscosity but allow you to view more slides with one application. There are some tradeoffs between the two types but both types are good oils. For an amateur in microscopy any standard immersion oil you can buy on Amazon will do just fine.
How to Apply Immersion Oil
WARNING: Immersion oil should only be used on objectives designated as “Oil” objectives if you try to use immersion oil on dry objectives you will most likely damage the objective. Dry objectives are not sealed in a way that will keep the immersion oil from getting into the objective lens structure. This can cause permanent damage to the objective and it will probably need to be replaced.
Now that we have the public service announcement out of the way let’s go through the steps to using immersion oil.
When using immersion oil, you need to use a coverslip over your specimen. If you try to put the immersion oil directly on a specimen it will contaminate and probably move your specimen. After you have placed your specimen on the slide place your coverslip over the slide using tweezers. I would suggest not using your fingers to do this because you could get fingerprints or smudges on your coverslip which can distort the image.
Now that you have your slide prepped you can view your specimen all the way up to your highest power dry objective. For more information on how to properly use a microscope see How to Use a Microscope: 16 Easy Steps with Pictures.
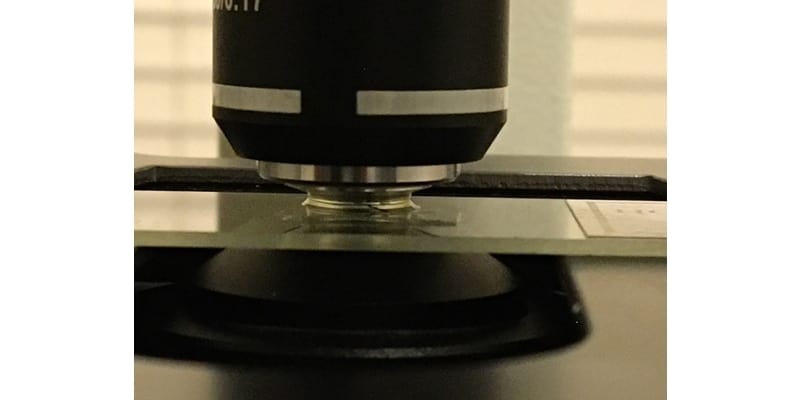
Once you are on your highest power dry objective and you are ready to move to the oil objective, I would recommend rotating your objective lens halfway between the oil objective and your last objective you had in place. This will give you some room to apply the oil. Lower the stage slightly using the coarse adjustment knob and apply one drop of immersion oil to the coverslip of the slide.
A lot of people miss this next step. Not only do you need to apply the oil to the slide but also to the condenser lens. To do this unlatch the stage clip from the slide and move the slide out. Lower the condenser rack so that the condenser is at its lowest level. Place a drop of immersion oil on top of the condenser lens.
Now you can engage the stage clip and put the slid back into place on the stage over the condenser. Slowly raise the condenser rack up until the oil on the condenser lens touches the slide. Now you can lock the oil objective in place, making sure you hear the click to indicate that the objective is properly engaged.
Using the fine adjustment knob slowly raise the stage until the oil on the cover slip touches the lens of the oil immersion objective. Now you can use the find adjustment knob to focus the image.
How to Clean Immersion Oil
Once you’re finished with your observation you will need a couple things to clean up:
- Lens paper (not kimwipes).
- Lens cleaning solution.
- Q-tips (Optional).
Clean the Slide
The first step is to remove and clean the slide. Lower the stage to the lowest position and remove the slide. Remove the coverslip and dispose of the specimen safely depending on what it is.
Rinse the slide and use lens paper and lens cleaning solution to clean the slide in a circular motion. The lens paper only needs a small dab of cleaning solution and it will absorb into a larger area of the lens paper. Do this until the slide is clean and dry. The cover slip can be thrown away or rinsed and cleaned the same way.
Clean the Objective
When cleaning the objective, you can either unscrew the objective and use objective case as a holder while cleaning, or you can leave the objective screwed into the nosepiece.
Dab the lens paper against the opening of the lens cleaning solution to get some solution on the lens paper and then holding each side of the lens paper move the lens paper across the lens of the objective until you reach the end. You may need to use a second piece a lens papers the next time because the first piece will most likely contain a large amount of oil. Keep doing this until the objective lens is clean and dry and there is no trace of oil.
You should not need to clean any of your other lenses unless it happens to be time for your regularly scheduled cleaning as part of the maintenance of your microscope.
If you do want to clean your other objectives, you can clean it the same way but DO NOT you the same lens paper you used to remove the oil. If you do the oil can get on the dry objectives.
The last tip is do not put this step off or wait a long amount of time after you are finished using the oil on the objective. If the oil sits on the objective, it can make it much more difficult to remove later. For more information on how to clean an objective lens take a look at this post.
Clean the Condenser Lens
The last step is to clean the condenser lens. The process is the same using the lens paper with some lens cleaner to first remove the oil and then subsequent applications to clean the lens.
You can optionally use a Q-tip to help you clean the lens in a circular motion instead of pressing on it with your fingers. Continue this process until the condenser lens is clean and dry and there is no visible streaks or dust.
Takeaways
Immersion oil is the microscopy hack to reach a numerical aperture higher than the theoretical limit of air. It has been used for many years to increase the magnification and see the detail of some of the most elusive and small microorganisms.
The Immersion oil technique is an indispensable tool in your microscopy tool belt, and I hope this article has given you everything you need to go out and try it yourself.